
Substrate preparation: Waterproofing likes clean surfaces.
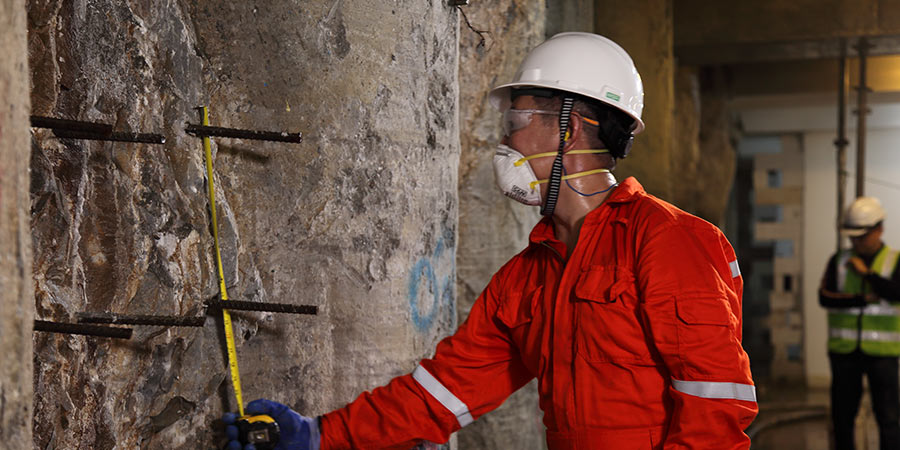
There are a wide array of sheet and fluid-applied waterproofing materials available to protect structures, yet even the best of these will not perform adequately without proper surface preparation. Contractors face many challenges in preparing substrates, such as walls with protruding rebar that need to be waterproofed. It is difficult enough to waterproof a conventional wall substrate that doesn’t have steel reinforcement. Yet to ensure waterproofing systems perform as needed requires that clean surfaces, which is why substrate preparation is important.
Follow these below steps so that you are giving the membrane the best chance of forming a tight seal to the substrate.
- Clean all concrete surfaces so they are free from all forms of scale, laitance, dust, mold, form oils, wax and curing agents as well as any material that can impact the bonding of the waterproofing membrane to the substrate. Cleaning can be done via mechanical means (such as compressed air, sweeping, abrasive cleaning or high-pressure water jetting) or using chemicals to remove materials such as oil or dirt.
- Grind down any surfaces that are rough. Having a substrate with a smooth surface helps ensure there is a tight seal between the substrate and the waterproofing membrane.
- Remove surface defects. This involves:
- Using tools that will not damage adjacent areas
- Using material such as dry pack Portland mortar that are compatible with the concrete substrate
- Using a bonding agent to provide better adhesion of the repair material to the concrete
- Wet curing the area within the first 24 hours after making repairs
Addressing Common Substrate Defects
| DEFECT | METHOD | TOOL |
|---|---|---|
| Holes/ voids | 1. Clean out all dust, dirt and loose stones etc. 2. Plaster back to original profile using non-shrink grout or a sand/ cement/ polymer mix. |
Clean using brush, broom or vacuum cleaner. |
| Cracks {non-structural) |
1. "V" out to a minimum depth of 25 mm. 2. Remove all loose debris from affected area. 3. Plaster back to original profile using non-shrink grout or specified patch repair plaster. |
"V" using a hammer and chisel or a mechanical hacker. Mixing of patching compounds using drill & mixing attachment and mixing bucket. |
| Honeycomb areas | 1. Hack back to sound concrete. 2. Plaster back to original profile using non-shrink grout or recommended repair plaster. |
Hack using a hammer and chisel or a mechanical hacker. Mixing of patching compounds using drill & mixing attachment and mixing bucket. |
| Rough surfaces | 1. Grind to a smoother profile. 2. Apply sand/ cement screed over affected area. 3. Apply recommended layer of plaster topping over affected area. |
Grind using electrical grinder or concrete grinder. Apply screed using a steel float and finish off with a wood float. |
| Sharp protrusions | 1. Grind off. | Grind using electrical grinder. |
| Sharp external corners | 1. Grind off to a smooth radius. | Grind using electrical grinder. |
| Dirt/ oil grease loose plaster etc |
1. Remove with a high pressure water jet. | |
| Internal corners and around penetrations | 1. Apply a sand/ cement fillet or as specified by manufacturer, to all internal corners and penetrations. 2. Alternatively, install reinforcement at these areas. |
For mixing small quantities of sand/ cement plaster, patching compounds etc., use diamond point trowels. For constructing coves and fillets, use margin & coving trowels. |
| Brick surfaces | 1. Proper pointing to the joints. 2. Apply cement sand render to the height of the upturn or to specified height of the waterproofing membrane. |
Source: Building and Construction Authority
Waterproofing in damp conditions
It is preferable to apply waterproofing membranes under dry weather conditions. However, damp/wet surfaces are very common in basement walls and slabs, due to ground water presence. The deeper the basement, the more serious this issue.
For heavily reinforced soil-retaining walls or diaphragm walls, substrate preparation can be particularly challenging. Wall surfaces tend to be very rough and uneven, with many voids and lots of rebar. These surfaces are often damp, and sometimes suffer from leaks and flowing water. For these difficult environments, AQUELLA® waterproofing is a fluid-applied system that waterproofs diaphragm walls and contiguous bored pile walls, which are common in tunnel and transit projects as well as deep basements in hospitals, museums and other commercial structures. Fortunately, these waterproofing membranes offer high performance, even amid damp substrate or a high humidity environment.
No matter the waterproofing system being used, be sure to follow the manufacturer’s guidelines for substrate preparation prior to installation of the membrane. If you have any questions or concerns, ask the manufacturer for field support to help ensure that surface preparation and membrane installation are performed properly.
Learn more about AQUELLA® waterproofing
Tags
- AQUELLA®
- Waterproofing